Pi-hole is a Linux network-level advertisement and Internet tracker blocking application which acts as a DNS sinkhole and optionally a DHCP server, intended for use on a private network. https://en.wikipedia.org/wiki/Pi-hole
This means that if set up correctly, all the devices on your network can benefit from the fact that some of the URLs your devices go to, can be blocked if you wish them to. By default, Pi-Hole comes with a list but the list can be customized by you. For example, if you want to add a website like “super-sketchy-website-to-block.com” to your list, your devices won’t be able to go to that URL.
When completed, you’ll have the Pi-Hole app running on your Raspberry Pi server and your router configured to point DNS requests to that server.
For those who don’t know what DNS is, think of it as a ‘phone book’ that your network uses to lookup IP addresses. Devices like your mobile phone can only go to a website like amazon.com if it knows the specific IP address. It first talks to a DNS server, gets the IP address, and then your phone can go to that website.
In this tutorial, we will be performing the following:
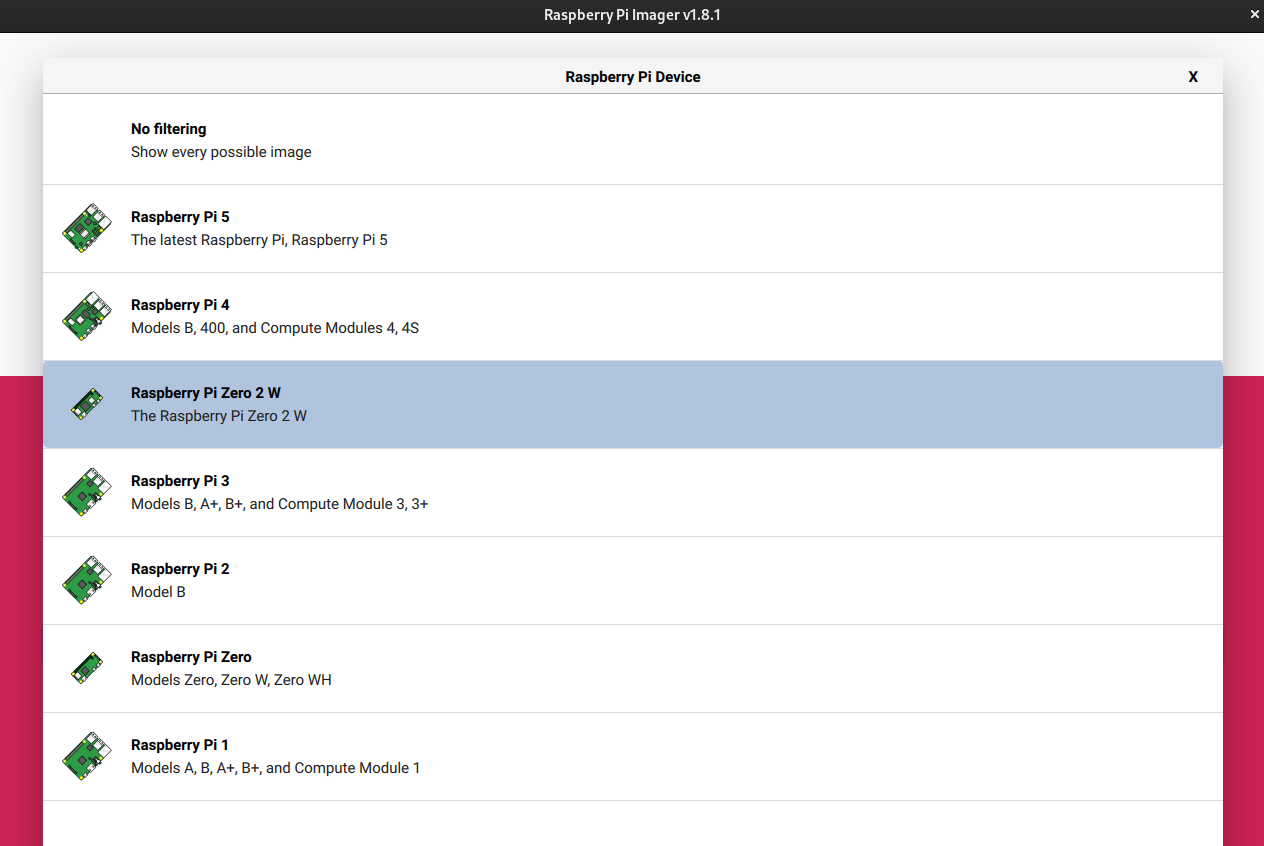
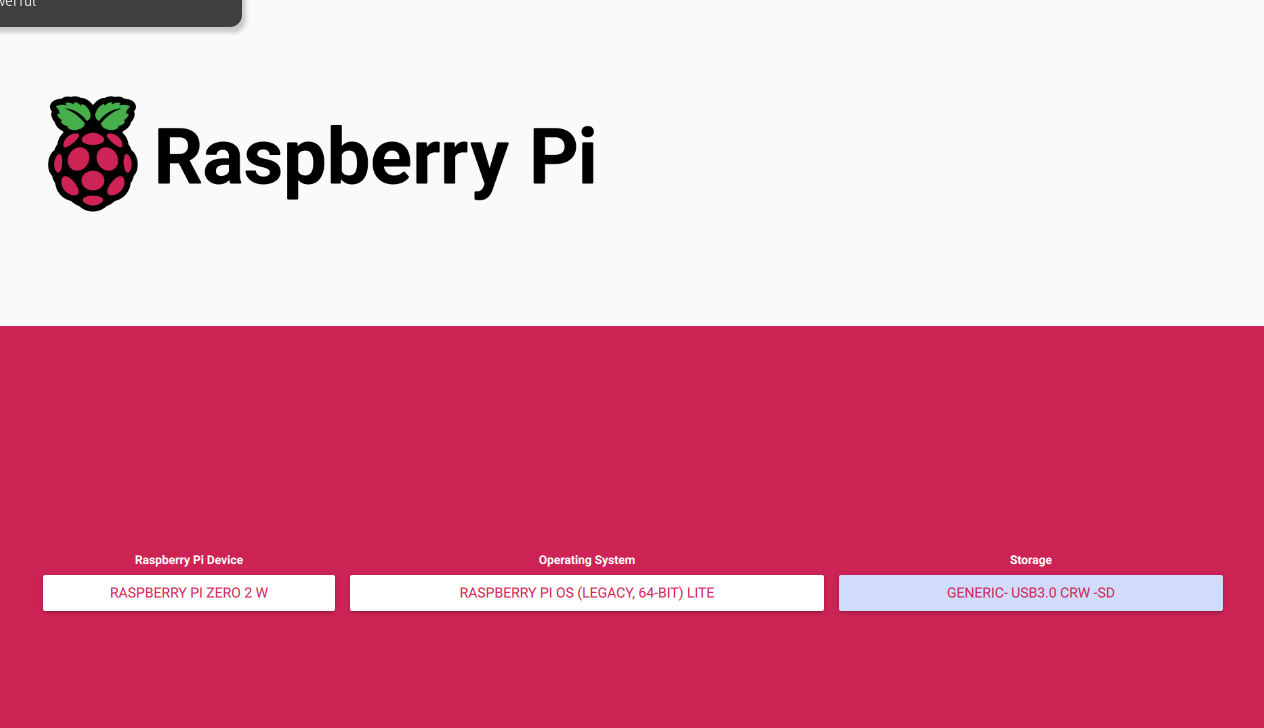
Select your device. In my case, this will be a Raspberry Pi Zero 2 W
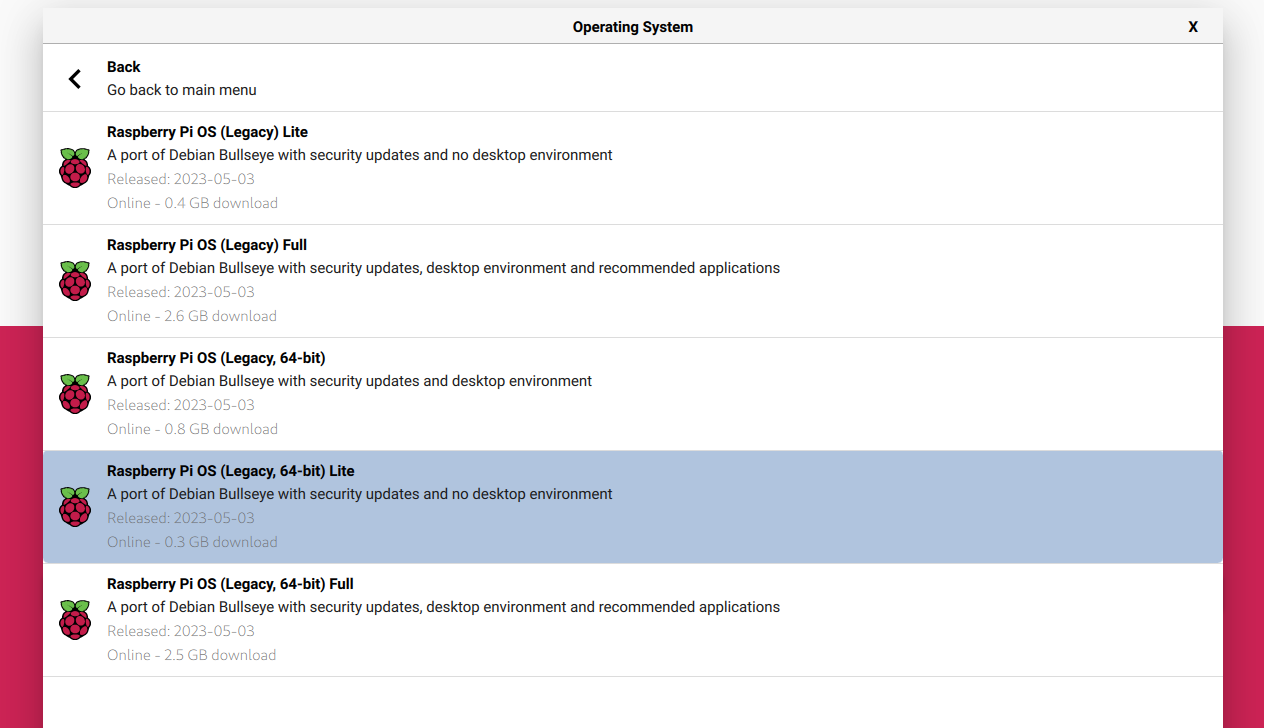
Select your Operating System. In my case, since I don’t intend on having a GUI, I will be downloading “Raspberry Pi OS (Legacy, 64-Bit) Lite
For Storage, select your SD Card you inserted. Be careful here since you’ll be overwriting this storage source.
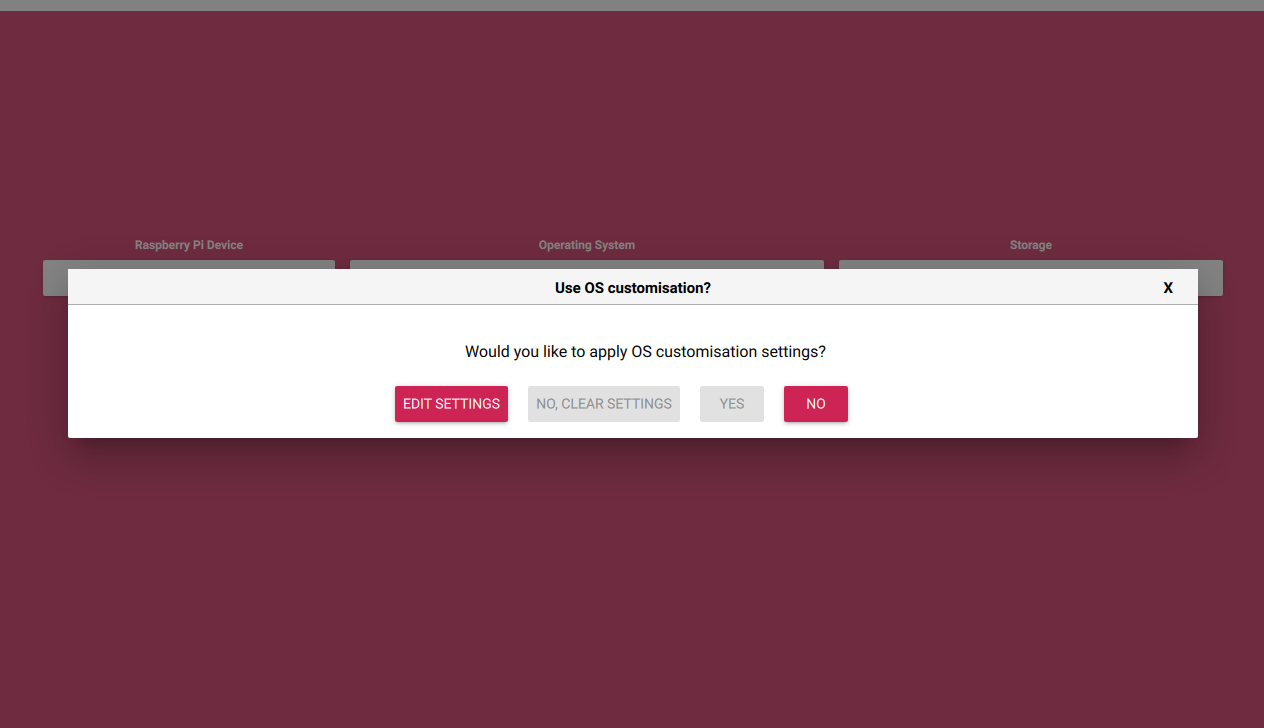
Click Edit Settings. This lets you set things like a password, username, and even configure the device for WiFi if you’re not plugging this directly into your router.
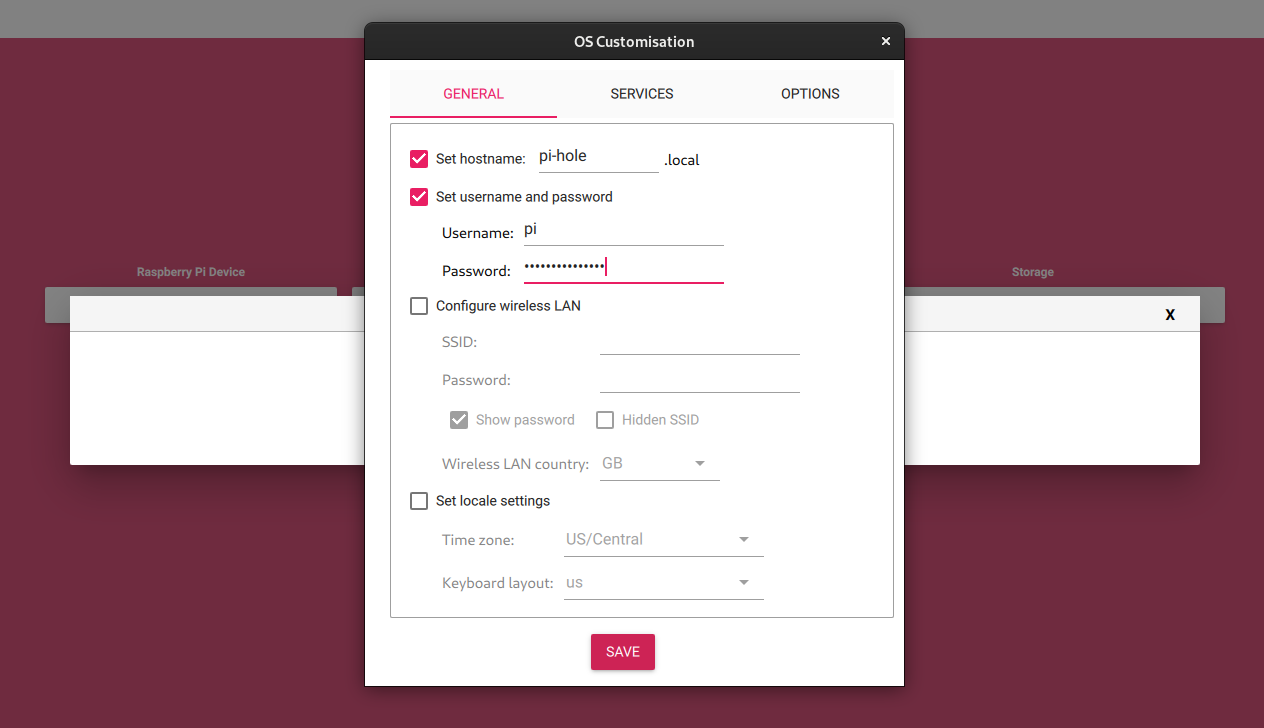
In GENERAL, set a hostname (e.g. pi-hole.local), and set a username and password (e.g. pi and a strong password)
Click on Configure wireless LAN if you are using Wi-Fi and NOT connecting to a port on your router
Click Next
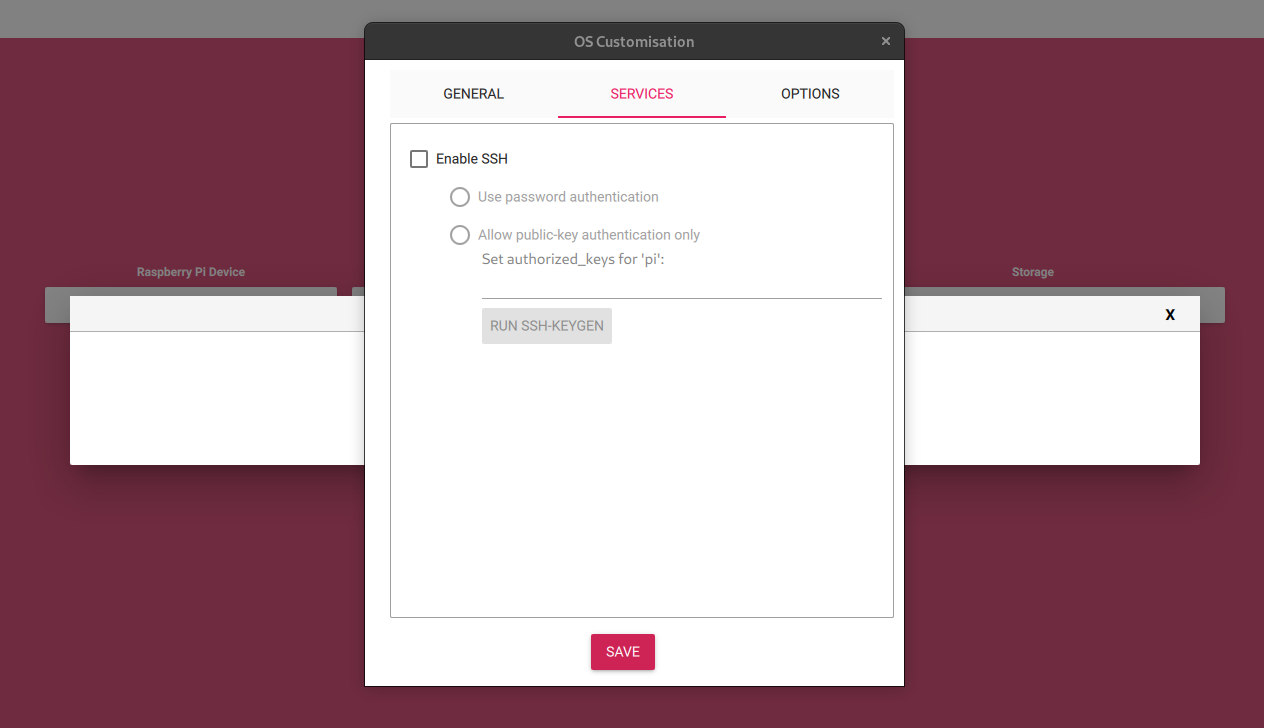
In SERVICES, click on Enable SSH
If you’re an advanced user, select Allow public-key authentication only
Otherwise, just select Use password authentication
In OPTIONS, leave as is or modify whatever settings you desire.
Play Sound when finished is nice if you’d like to hear an audible sound when the writing process has completed
Eject media when finished is nice so you don’t have to eject manually
Enable telemetry sends anonymous data to the Raspberry Pi Foundation
According to they say this about Enabling telemetry:
Raspberry Pi introduced download telemetry as part of a plan to ensure the most popular operating systems are easier to find in the imager’s menu system. It does not collect a device’s IP address. Telemetry is on by default, and the new advanced options menu makes it a bit easier to opt out than previously.
Raspberry Pi publishes the telemetry data it collects on its stats page. According to its stats on downloads over the past month, Raspberry Pi OS (32-bit) is the most popular OS with a 45% share among those who use the installer. It’s followed by other versions of Raspberry Pi OS (24%), Ubuntu (13%), RetroPie (5.4%), and LibreELEC (3.1%).
Click on SAVE
Click on YES when the prompt says Would you like to apply OS customization settings
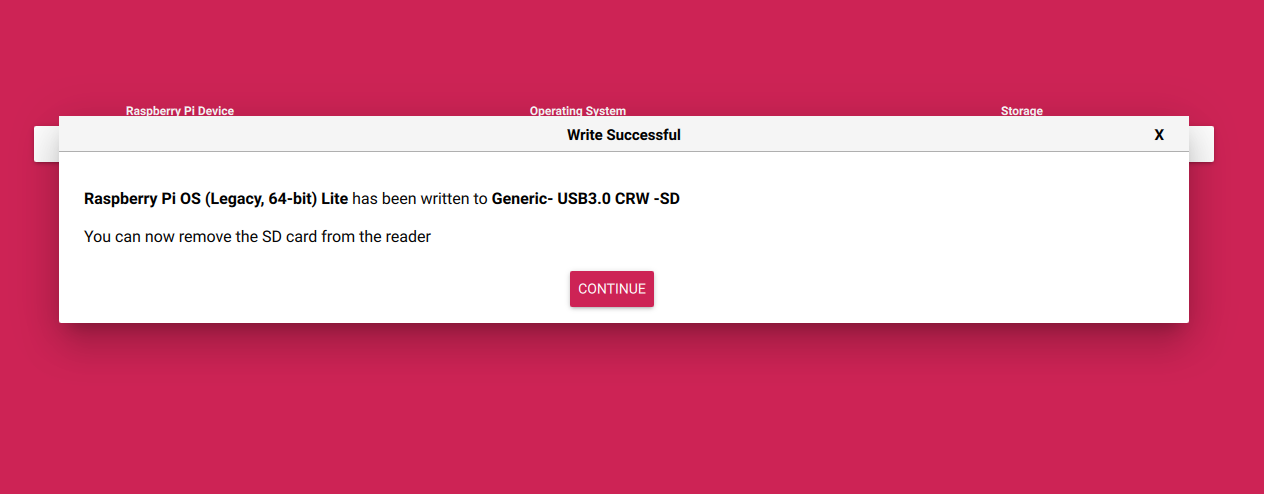
This will warn you that All existing data on your SD Card will be erased and if you’re sure to continue. Click YES
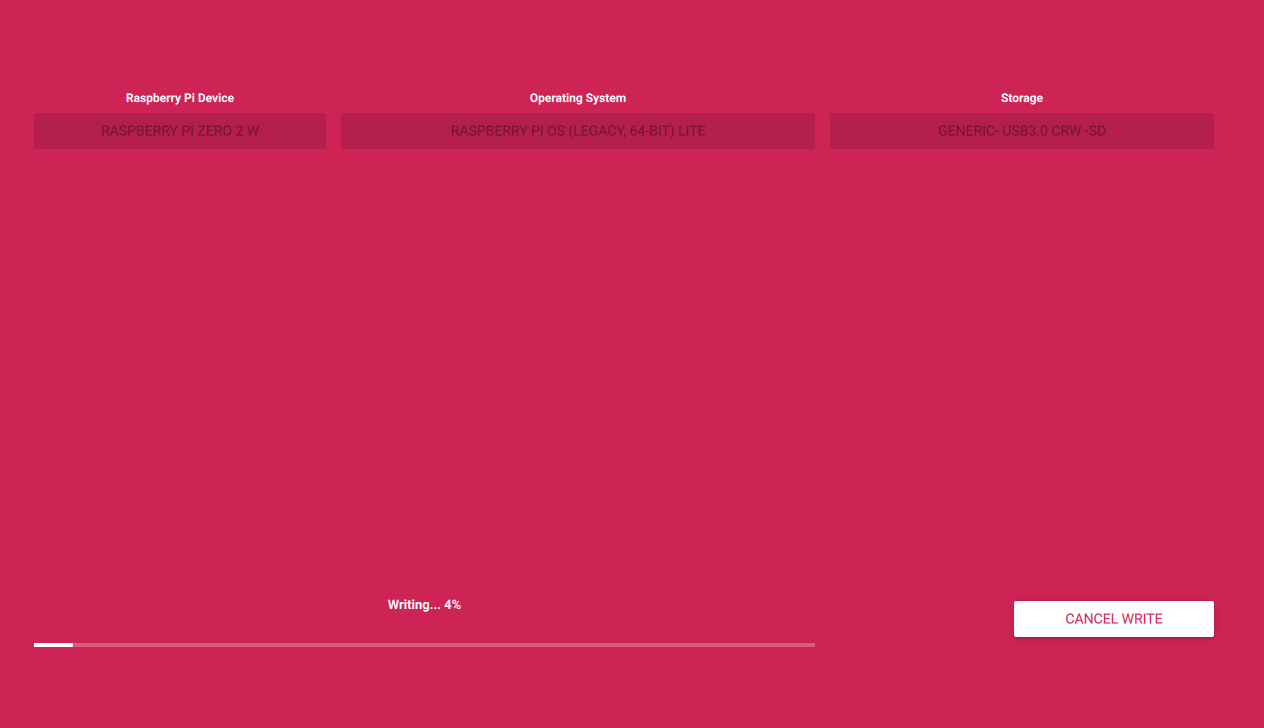
The Writing process will now begin and then Verify. When complete, click CONTINUE
Take out your SD Card and insert it into the Raspberry Pi SD Card Slot
Connect Raspberry Pi to your network
Power on the Raspberry Pi
Disclaimer: I am assuming you know how to log into your router. If you don’t, you may need to reference your router’s specific procedure for logging into it. In a lot of cases, you can simply connect to it by going to 192.168.1.1 and then using the log-in credentials listed on the router, your manual, or those given to you by your Internet Service Provider (ISP)
If using Ethernet or Wi-Fi:
To verify if it’s connected to WiFi, open up a terminal and try pinging the Pi after waiting about a minute from it being powered on. If the hostname you selected was pi-hole, then type the following: ping pi-hole.local
If you packets were transmitted, you can now skip to the next section and log into the Raspberry Pi
If you can not connect to the Raspberry Pi using the hostname, you will need to either wait a few minutes or log into your router to see what the IP address is.
Once you get the IP address (e.g. 192.168.1.123), ping the IP address and verify it is up
If it is still not up, you may need to power cycle the Raspberry Pi
Logging into the Raspberry Pi using PowerShell / Terminal
Now that we know the Raspberry Pi is Online, we can log into it using the SSH protocol. To do so:
Open PowerShell (if using windows), or Terminal (if using MacOS / Linux)
Type in
ssh [email protected](assuming you named it pi-hole. if you did not, type in the hostname you gave it)
Type in the password that you initially typed into the Raspberry Pi Imager up above
Perform an update on the Raspberry Pi by typing the following command
sudo apt update
The above, will give us a list of all the available updates we can perform
Once we get that list, we can apply them by typing in the following
sudo apt upgrade
Click Y for YES to apply those updates
This completes the steps necessary to set up the Raspberry Pi and have it fully updated before we continue with the installation of the Pi-Hole software
Installing Pi-Hole
There are several ways to install Pi-Hole on your device.
The first command installs the git library. This lets you use git functions such as ‘git clone‘ which is a method for downloading data from a git server, such as GitHub. This is where a lot of developers upload their code to.
The second command downloads the files to install the application in a folder called Pi-Hole.
cd "Pi-hole/automated install/"
The third command has us “change directory” into a folder inside the Pi-Hole folder called automated install.
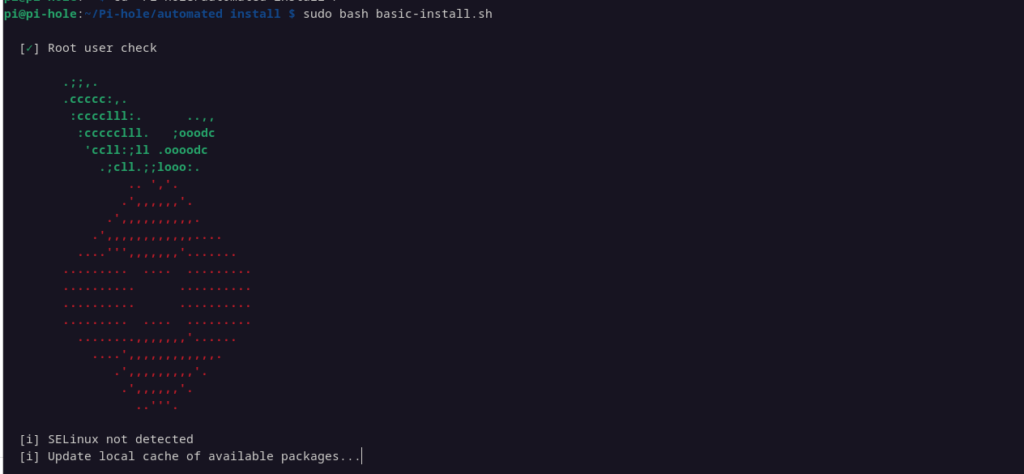
sudo bash basic-install.sh
The fourth command executes the installation script
Pi-Hole Installation Status in the CLI
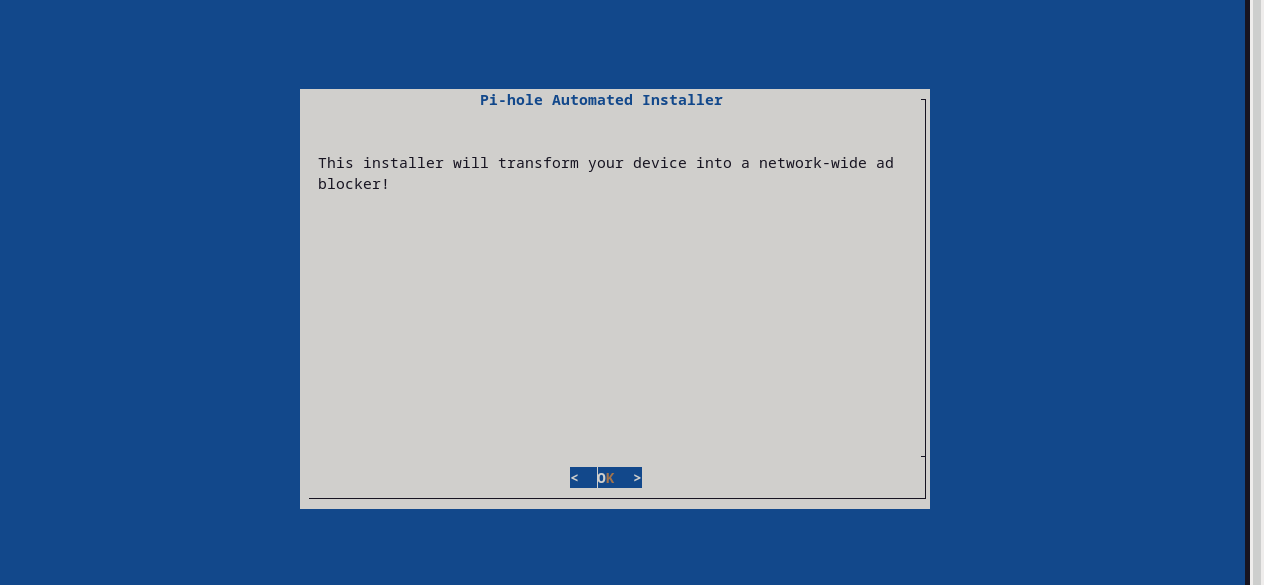
As the installation starts, Pi-Hole will ask for a few questions.
Click Ok
On the page where Static IP Needed, you’ll need to mark this Raspberry Pi as having a Static IP in your router.
Click Continue to Set Static IP using current values which display the IP address and Gateway at the top of the screen
Selecting an Upstream DNS provider is next. What this means is that if the URL didn’t get sucked into Gravity, the URL will still need to be looked up by a DNS once it passes that filter. I personally recommend Cloudflare (DNSSEC). Select it with the arrows on your keyboard and click Continue
Click Yes on the BlockLists page. This sets a default list called StevenBlack’s Unified Hosts List but you can add more lists later, when we log into the website hosted on the Raspberry Pi.
Click Yes to install the Admin Web Interface
Click Yes on the Web Server install
Click Yes on Enable Logging
For Privacy mode, this is up to you. I do Show Everything but this can be changed later
Once you click Yes, the installation will continue back in the terminal, applying your selections.
Installation is Complete! In a browser, go to http://pi.hole/admin or the IP is listed. It also provides you with a password to login which you can change later. SAVE THIS PASSWORD!!!
Testing DNS from a PC / Laptop
Next up, we’ll test that Pi-Hole works for a single device, before we try and apply a network wide update.
After that’s done, try going to a site that you normally see ads on
If you see less ads, you should be confident that the ad blocker is working.
Log into the Pi-Hole by going to <ip-address>/admin in your browser and you should see some numbers increase.
Once you’ve verified that this is working, you may now configure your router to point to the IP address of your pi-hole device
Updating Router DNS Settings to point to Pi-Hole
Each router is different, and unfortunately I can’t provide specific instructions here to configure the device but the core idea is that you’ll be logging into the router and changing the default DNS settings so that instead of pointing to the settings configured by your ISP or perhaps you already changed it to something like CloudFlare’s 1.1.1.1 or Google’s 8.8.8.8, you’ll instead point to the IP of your Pi-Hole device.
You should start seeing traffic populate in your dashboard.
If you would like to log into the Raspberry Pi without using a password, follow the optional guide below
(Optional) Log into the Raspberry Pi using Public Key Authentication
If you don’t want to use your password and have generated a private / public key pair, type in this command to pass your public key to the Raspberry Pi:
ssh-copy-id -i ~/.ssh/id_ed25519.pub pi-hole
or if you’re using RSA
ssh-copy-id -i ~/.ssh/id_ed25519.pub pi-hole
If you’re on Windows, follow my tutorials below to learn how to install OpenSSH on your computer and how to generate the Private and Public Key pairs:
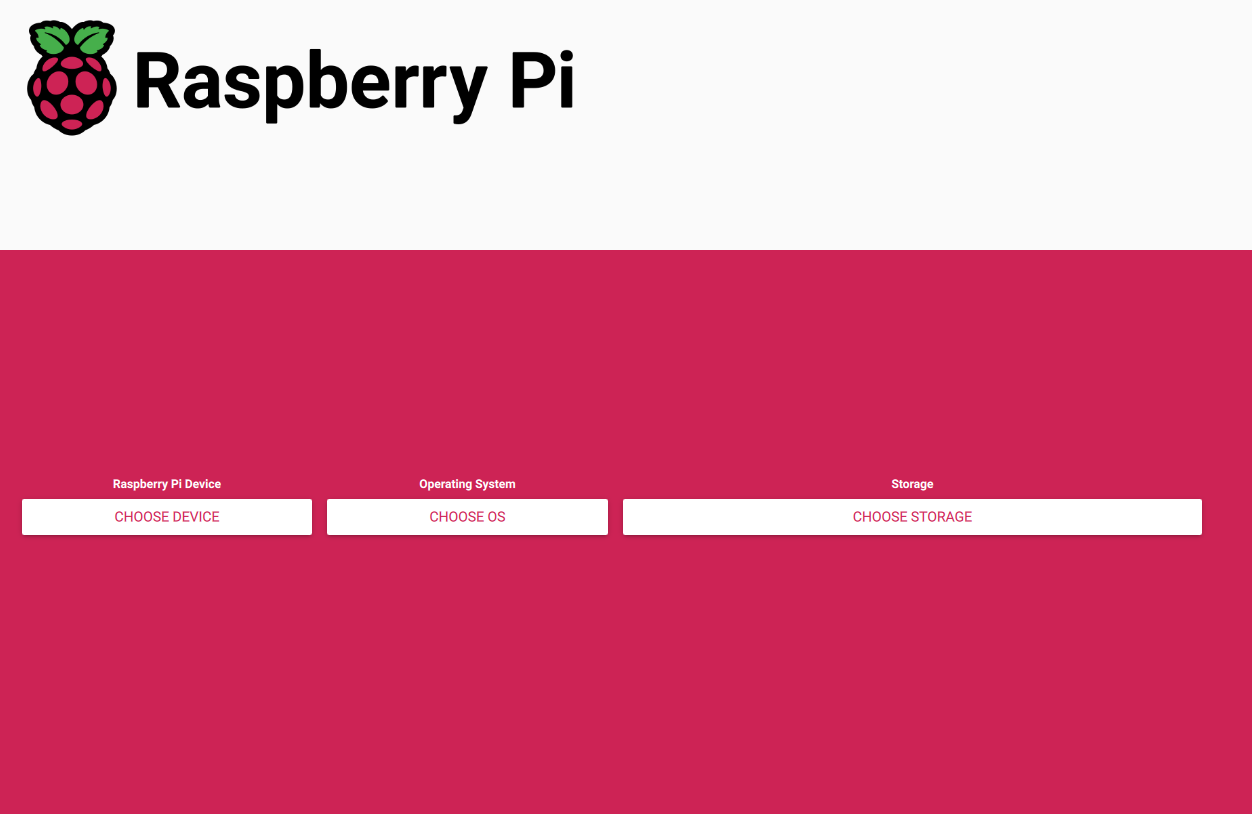
Downloading Raspberry Pi Imager (this is how we’ll write the Raspbian OS to the Raspberry Pi)
We’ll then connect to the Raspberry Pi to your network once we lookup the IP address on your router
Using the Terminal (e.g. PowerShell, MacOS Terminal, or your Linux Terminal) we’ll log in and install Pi-Hole
Once installed, we’ll test that we can hit the Pi-Hole with your PC / Laptop
Configuring your router will be the last step where we’ll point the default DNS settings from the existing ones to the Pi-Hole server
With that complete, all the devices on your network will now be able to send DNS requests to the Pi-Hole and if the URL is in the block list, the URL will be blocked.
I am installing Pi-Hole on a small, $15 server (though the price has been jacked up on Amazon and other sites)
Pre-requisites
A Linux based server (e.g. Raspberry Pi such as the one pictured above, a potato (preferably capable of running Linux), or a Virtual machine). Can also be installed as a Docker container, but that’s outside of the scope of this tutorial
A Micro SD Card
Access to the password in your home router since we’ll need to configure the router at the end of the tutorial
An internet connection 😉
A second PC / Laptop to connect with
Patience!
Micro SD in the PC / Laptop
First, make sure the Micro SD Card is plugged into your PC / Laptop
Select your device. In my case, this will be a Raspberry Pi Zero 2 W
Select your Operating System. In my case, since I don’t intend on having a GUI, I will be downloading “Raspberry Pi OS (Legacy, 64-Bit) Lite
For Storage, select your SD Card you inserted. Be careful here since you’ll be overwriting this storage source.
Click Edit Settings. This lets you set things like a password, username, and even configure the device for WiFi if you’re not plugging this directly into your router.
In GENERAL, set a hostname (e.g. pi-hole.local), and set a username and password (e.g. pi and a strong password)
Click on Configure wireless LAN if you are using Wi-Fi and NOT connecting to a port on your router
Click Next
In SERVICES, click on Enable SSH
If you’re an advanced user, select Allow public-key authentication only
Otherwise, just select Use password authentication
In OPTIONS, leave as is or modify whatever settings you desire.
Play Sound when finished is nice if you’d like to hear an audible sound when the writing process has completed
Eject media when finished is nice so you don’t have to eject manually
Enable telemetry sends anonymous data to the Raspberry Pi Foundation
According to they say this about Enabling telemetry:
Raspberry Pi introduced download telemetry as part of a plan to ensure the most popular operating systems are easier to find in the imager’s menu system. It does not collect a device’s IP address. Telemetry is on by default, and the new advanced options menu makes it a bit easier to opt out than previously.
Raspberry Pi publishes the telemetry data it collects on its stats page. According to its stats on downloads over the past month, Raspberry Pi OS (32-bit) is the most popular OS with a 45% share among those who use the installer. It’s followed by other versions of Raspberry Pi OS (24%), Ubuntu (13%), RetroPie (5.4%), and LibreELEC (3.1%).
Click on SAVE
Click on YES when the prompt says Would you like to apply OS customization settings
This will warn you that All existing data on your SD Card will be erased and if you’re sure to continue. Click YES
The Writing process will now begin and then Verify. When complete, click CONTINUE
Take out your SD Card and insert it into the Raspberry Pi SD Card Slot
Connect Raspberry Pi to your network
Power on the Raspberry Pi
Disclaimer: I am assuming you know how to log into your router. If you don’t, you may need to reference your router’s specific procedure for logging into it. In a lot of cases, you can simply connect to it by going to 192.168.1.1 and then using the log-in credentials listed on the router, your manual, or those given to you by your Internet Service Provider (ISP)
If using Ethernet or Wi-Fi:
To verify if it’s connected to WiFi, open up a terminal and try pinging the Pi after waiting about a minute from it being powered on. If the hostname you selected was pi-hole, then type the following: ping pi-hole.local
If you packets were transmitted, you can now skip to the next section and log into the Raspberry Pi
If you can not connect to the Raspberry Pi using the hostname, you will need to either wait a few minutes or log into your router to see what the IP address is.
Once you get the IP address (e.g. 192.168.1.123), ping the IP address and verify it is up
If it is still not up, you may need to power cycle the Raspberry Pi
Logging into the Raspberry Pi using PowerShell / Terminal
Now that we know the Raspberry Pi is Online, we can log into it using the SSH protocol. To do so:
Open PowerShell (if using windows), or Terminal (if using MacOS / Linux)
Type in
ssh [email protected](assuming you named it pi-hole. if you did not, type in the hostname you gave it)
Type in the password that you initially typed into the Raspberry Pi Imager up above
Perform an update on the Raspberry Pi by typing the following command
sudo apt update
The above, will give us a list of all the available updates we can perform
Once we get that list, we can apply them by typing in the following
sudo apt upgrade
Click Y for YES to apply those updates
This completes the steps necessary to set up the Raspberry Pi and have it fully updated before we continue with the installation of the Pi-Hole software
Installing Pi-Hole
There are several ways to install Pi-Hole on your device.
The first command installs the git library. This lets you use git functions such as ‘git clone‘ which is a method for downloading data from a git server, such as GitHub. This is where a lot of developers upload their code to.
The second command downloads the files to install the application in a folder called Pi-Hole.
cd "Pi-hole/automated install/"
The third command has us “change directory” into a folder inside the Pi-Hole folder called automated install.
sudo bash basic-install.sh
The fourth command executes the installation script
Pi-Hole Installation Status in the CLI
As the installation starts, Pi-Hole will ask for a few questions.
Click Ok
On the page where Static IP Needed, you’ll need to mark this Raspberry Pi as having a Static IP in your router.
Click Continue to Set Static IP using current values which display the IP address and Gateway at the top of the screen
Selecting an Upstream DNS provider is next. What this means is that if the URL didn’t get sucked into Gravity, the URL will still need to be looked up by a DNS once it passes that filter. I personally recommend Cloudflare (DNSSEC). Select it with the arrows on your keyboard and click Continue
Click Yes on the BlockLists page. This sets a default list called StevenBlack’s Unified Hosts List but you can add more lists later, when we log into the website hosted on the Raspberry Pi.
Click Yes to install the Admin Web Interface
Click Yes on the Web Server install
Click Yes on Enable Logging
For Privacy mode, this is up to you. I do Show Everything but this can be changed later
Once you click Yes, the installation will continue back in the terminal, applying your selections.
Installation is Complete! In a browser, go to http://pi.hole/admin or the IP is listed. It also provides you with a password to login which you can change later. SAVE THIS PASSWORD!!!
Testing DNS from a PC / Laptop
Next up, we’ll test that Pi-Hole works for a single device, before we try and apply a network wide update.
After that’s done, try going to a site that you normally see ads on
If you see less ads, you should be confident that the ad blocker is working.
Log into the Pi-Hole by going to <ip-address>/admin in your browser and you should see some numbers increase.
Once you’ve verified that this is working, you may now configure your router to point to the IP address of your pi-hole device
Updating Router DNS Settings to point to Pi-Hole
Each router is different, and unfortunately I can’t provide specific instructions here to configure the device but the core idea is that you’ll be logging into the router and changing the default DNS settings so that instead of pointing to the settings configured by your ISP or perhaps you already changed it to something like CloudFlare’s 1.1.1.1 or Google’s 8.8.8.8, you’ll instead point to the IP of your Pi-Hole device.
You should start seeing traffic populate in your dashboard.
If you would like to log into the Raspberry Pi without using a password, follow the optional guide below
(Optional) Log into the Raspberry Pi using Public Key Authentication
If you don’t want to use your password and have generated a private / public key pair, type in this command to pass your public key to the Raspberry Pi:
ssh-copy-id -i ~/.ssh/id_ed25519.pub pi-hole
or if you’re using RSA
ssh-copy-id -i ~/.ssh/id_ed25519.pub pi-hole
If you’re on Windows, follow my tutorials below to learn how to install OpenSSH on your computer and how to generate the Private and Public Key pairs: